Starting GSAS-II
A video version of this tutorial is available at
https://anl.box.com/v/StartingGSAS
Starting GSAS-II is done in different ways, depending on your OS and how
GSAS-II is installed.
One common way is start a console window, set the current
directory to the location of GSAS-II and then enter:
python GSASII.py
This will work if the default Python is as described in the
GSAS-II Wiki pages you found when downloading GSAS-II, otherwise you may have
to enter the correct path for that version of Python.
On Windows, the installer will usually create a
RunGSASII.bat file in the main GSASII
directory and place a shortcut to this file on
the Desktop, but it can be moved where desired.
On the Mac, the installer creates a GSASII.app file in the main GSASII
directory, which can be dragged to the doc. One can create a shortcut
to this file and the shortcut can be moved, for example to the
desktop, but do not move the GSASII.app file.
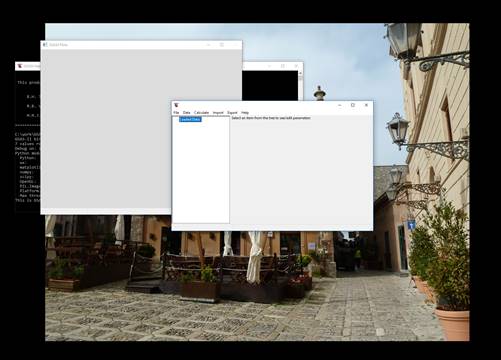
When GSAS-II starts, you should see three windows, two of which are almost empty.
The topmost one is a vertically split window; we will refer to this as
the
Data Window. The left side will contain a tree-like
outline of your GSAS-II project as you add data, phases, etc. The right side
will contain a display of data depending on your tree item selection; you can
change many of the items in this display depending on how you wish to use
GSAS-II. The second window, immediately under the first is labeled
GSASII Plots; this will contain tabbed graphical
displays, when appropriate, corresponding to the selected tree item. This may
be a crystal structure, powder pattern plot, etc. The tabs allow you to view
any recently produced plot. You may be able to interact with the current plot
via the mouse thus changing items in the data window; for example picking
powder pattern peaks from the powder pattern will add entries to the displayed
peak list.
The third window is the
GSAS-II console; it will display error messages, some results of calculations
(e.g. residuals from a refinement), etc. No input is taken from the GSAS-II
console as all interaction is via the GUI. These windows may be moved anywhere
on the screen or to a different display (real or virtual); GSAS-II will save
the locations of the first two when GSAS-II is exited. On a new start, they will
reappear in the saved locations (or else centered on the main computer screen
if they are now off screen). On Linux and Windows a menu bar appears at the top
of the
Data Window; on a Mac this menu will appear in the
system menu bar location (usually at the screen top).
The items in the menu bar are separated by a vertical
bar; those to the left “File …” are global for the GSAS-II project and those to
the right (if any) are for the specific data displayed on the right side of the
Data Window. On my Windows machine the screen looked
like:
The project file
contains all data and results related to the project you are working on.
(Exception: image files are not stored in the project; to save space only the
file name is saved.) The console window displays a banner and some information
about the version of Python and the packages used by GSAS-II. This console
window will display important information as data processing by GSAS-II
proceeds. You may wish to cut-and-paste parts of this window to another place
if desired.
For Windows, we suggest that you change the
properties of this window to
(in Windows: Properties/Layout) to have 9999 for the height and 150 for the
width and to allow “QuickEdit Mode” (if available)
for easy cut/paste operation. You can perhaps also change the font, font size,
font color and background color if desired. These settings will be retained for
subsequent uses of GSAS-II.